
Control Your Swift Dependencies Before They Control You
We often take dependencies for granted when building apps in Swift. Most of the time, this doesn’t lead to any problems, but it has a way of lulling many Swift developers into a false sense of security.
Dependency management in Swift is essential to maintaining the stability and security of your apps. It’s necessary if you’re going to build an app on time and budget. Done well, it avoids breaking issues, But as Brandon Williams from Point-Free pointed out in my conversation with him on EmpowerApps, we often underappreciate how much we rely on and compromise with other people’s code that we can’t control.
In this article, I’m covering what effective dependency management in Swift is, how it can make further development of your apps easier, and strategies for mocking dependencies during testing.
What is a dependency in Swift?
Despite most of us having a definite idea of what a dependency is in our minds, it is more than what you think. In the broadest sense, a dependency is anything in your app that requires an outside system that you do not directly control.
While we don’t usually refer to it as such, even Apple’s own code is a dependency within our apps or any time we touch an API, a clock, a file, a database or a date initializer. Even Apple’s own hardware is a kind of dependency. We don’t have any control over it or how it’s made – we can only trust that it will work because it’s in everyone’s interest that it always works and be ready for us. Often, we don’t think about something like Core Location as a dependency simply because we don’t add it as one in our applications.
Why is dependency management important for testing?
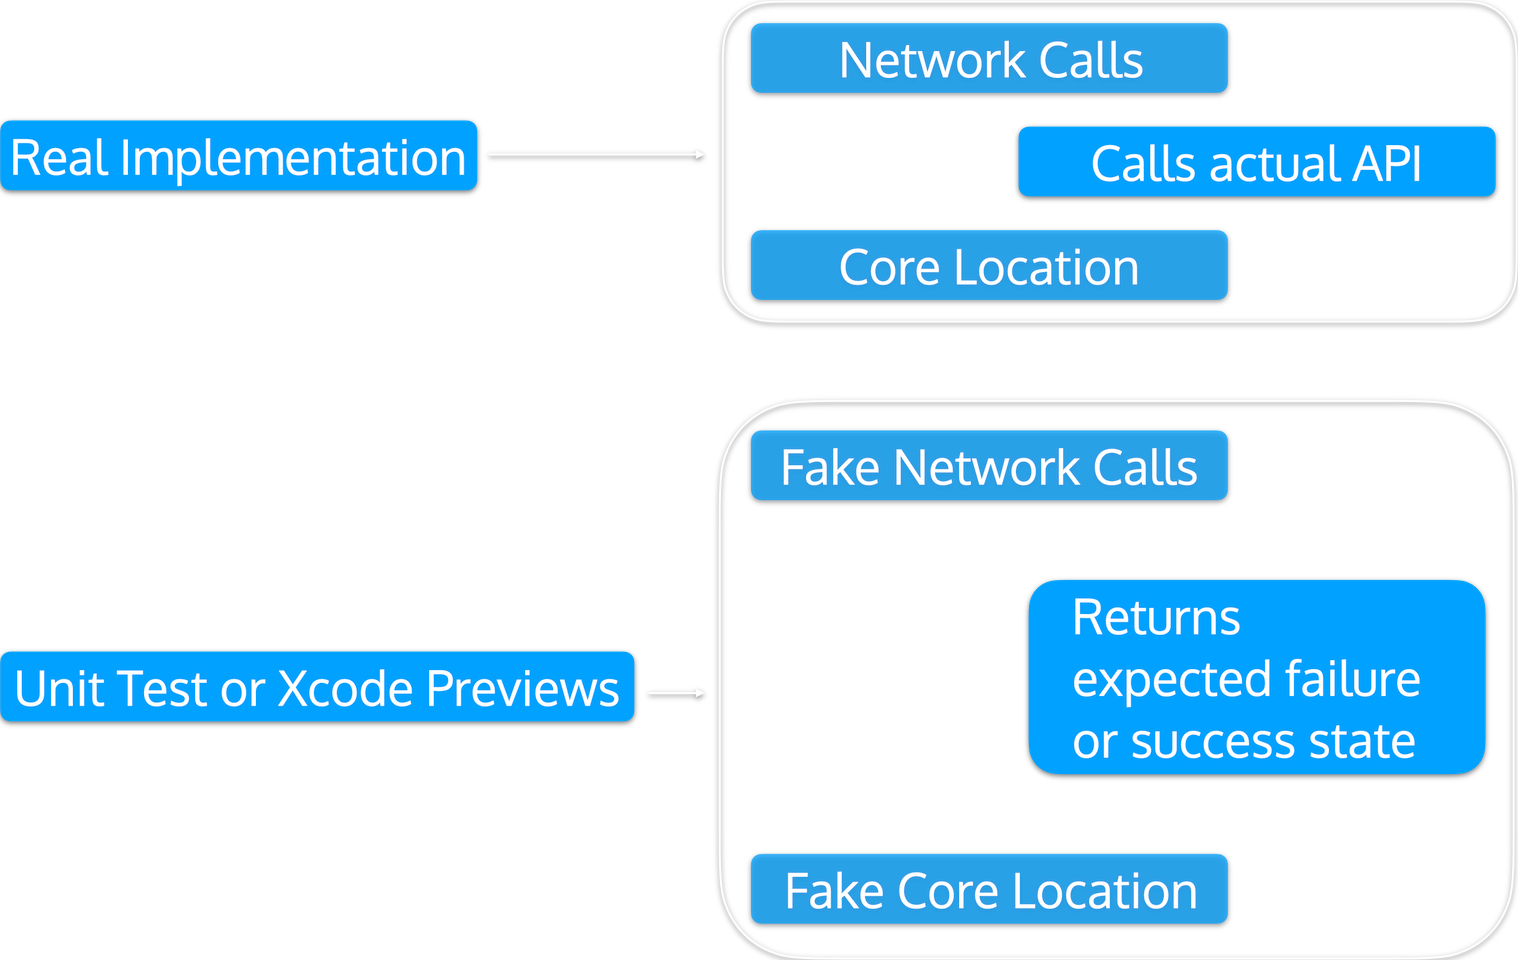
Mocking is an important part of testing with any dependency. As a general rule, you should be mocking anything that’s persistent or external. If you’re testing components that aren’t yet ready for your production app, mocking is a simple way to isolate this code for testing.
The real power of well-controlled dependencies is you can quickly and accurately predict what should happen in testing. If you have lots of code constantly calling for external resources, like location data or network requests, you’ll probably make your work very difficult for yourself. You might also make it impossible to effectively unit test those components of your app.
The most important thing to remember is to test how your code deals with various results, both passing and failing, and what is returned. Your goal should be to test code behavior based on what you need to get from a call.
So what do you need to know: if you’re making a call and expecting data to come back, then you need to focus on how that data is filtered and changed into something your app can use. You can only test that by having some control over the dependency.
If you’re new to unit testing in Swift, you’ve probably struggled with managing database and network calls. A lot of people fall into this trap and slow themselves down. A great way of escaping this trap is to think of it like you’re dealing with Apple’s own code. No one tests Apple’s APIs – we trust that they will work because it’s strongly in Apple’s interest that they do so. All you need to do is mock the data that you trust you will get.
XCode Previews
XCode Preview is worth mentioning here as, like unit testing, they’re a valuable way of testing views without spinning up your whole app. While they are similar in a general sense, Previews also present a couple of challenges:
The first thing is that the more you add to your project, the more likely you are to break your preview. To avoid that happening, you want to, as much as possible, break your projects up into lots of small, stable modules. This uses the principle of microapp architecture (also known as modular architecture). This has the added benefit of making it much easier to scale your app later on without sending your build time sky-high.
The other challenge is that there are a lot of APIs that will also break your preview. If the user needs to grant permission for something to work, XCode Previews doesn’t support that – it’s just how it works. So, if you need to iterate your views, you must find a way to mock the dependencies.
How to Mock Dependencies
In my chat with Brandon Williams, a fellow Swift programmer on EmpowerApps, we discussed dependency control. Brandon has a great way of framing how to weigh different considerations when mocking dependencies as a tradeoff between ergonomics and safety.
In this context, ergonomics means how it is designed to make it easy or comfortable for you as a developer. Brandon uses the example of the UserDefaults class – an easy way to store a user’s preferences and optimize your app’s behavior to them.
On the other side, you have safety. By its nature, Swift is a strong and safe language – variables are always initialized before use, memory is automatically managed, and exclusive access to memory protects you from many coding mistakes getting into your production app.
It is impossible to have an app that is both perfectly ergonomic and safe. It’s always a compromise. Brandon uses the example of providing initializers for all your variables with no defaults, which is extremely safe but will be a huge pain run in testing.
A reliable strategy for finding a balance between ergonomics and safety is with a dependency injection framework. The most popular ones all cut a different balance between ergonomics and safety, so which one you use will come down to what you need to test, the requirements of the project, and your own professional preference.
Protocols are not the only way (to pass a single function)
Protocols are the most popular way of putting your interface in front of something, but not the only way. If you only have to pass a single function as part of your mock – say, if you needed to mock access to a network – then it’s easier and simpler to pass the function rather than mocking a protocol to declare it.
So instead of:
protocol Adder {
    func doTheThing(x : Int, y: Int) -> Int
}

struct TheThing {
    let adder: Adder
}
You can just pass the function without the need for the protocol.
struct TheThing  {
    let adder : (Int, Int) -> Int
}
You substitute in for a protocol. When controlling for dependencies, you commonly will have only one or two implementations – one live, one mock. It ultimately simplifies mocking and doesn’t get you bogged down with the features and powers of protocols, which can make your life easier if you need to mock or test a function quickly.
Special thanks to Brandon Williams
Thanks again to Brandon Williams, whose thoughts and conversation were valuable in putting this article together. If you enjoyed this article, I encourage you to listen to my conversation with him on EmpowerApps. Brandon publishes videos on advanced Swift through his own brand, Point-Free, which are always worth a watch.