You Need A Plan For Swift Error Handling
With the use of Swift as the sole language for creating apps with Apple, it is now essential to know how to plan for, and respond to, Swift-based errors in your app.
There will always be errors you do not expect. As developers, we want as much information about how and why something failed to either make the best possible change to the code or to help the user respond. However, what is most helpful for the developer is not always so helpful for the user, which is critical to understand if you want a successful app.
This article is designed to help both developers and team managers:
- create a plan for dealing with errors; and
- offer examples of how to effectively handle the most common errors you’ll encounter.
Successful Swift Error Handling Always Starts With A Plan
If you’re on a team that manages an app’s codebase, or are the manager of that team, you need to have an effective plan for dealing with errors. Not having a plan, or having a plan not clearly understood by everyone, is going to needlessly create more work for everyone, and you’ll find it difficult to deliver a consistent and satisfying experience to your users.
An effective error handling plan for a Swift-built app should include:
- Recording and Tracking Errors
You need a tool that records and tracks errors. Crashlytics and Bugsnag are two popular ones. Beyond that, you should have some kind of internal process on the team level for acknowledging, assigning, and reviewing errors, so that they don’t use up more team resources than necessary to address. - Error Testing
If you expect an error and crash, you should test for those in your unit tests. While XCTest provides ways to test for errors, crashes take a little bit of work.
I’d recommend taking a look at the links on our Error Handling episode with Jeff Kelley or his presentation from 360iDev.
A successful testing approach for Swift should then include this functionality, allowing you to be able to proactively fix and, more importantly, anticipate and accommodate expected errors.
- Communicating With Users
This last part is essential to delivering a quality user experience. So many apps that experience errors do an inadequate job of communicating to the user how and why an error occurs, or what the user might be able to do to avoid the error in the future. A successful error handling plan should include an approach to using UI tools to inform and help your user when they experience an error using your app.
That last part of the plan, clearly communicating with and engaging your user in the event of an error, can be very challenging. To help, I’ve got examples of three of the most common types of errors you’ll likely encounter, and how to engage your users when they happen.
Networking Errors – Don’t Overwhelm Your User
Network errors are likely to be the most common type of error when developing an app with Swift. Most iOS apps, or apps of any kind for that matter, have networking as a core part of their functionality.
As a preventative measure, you want some sort of indication built into your app that there is network connectivity, especially if something is in progress. For example, if the app is transferring data, you should make that clear to your user and warn them not to disconnect.
Networking errors are a good example of the kind of error where you’ll likely need your user to take action. If your app tries to connect and the network is unavailable, use a dialogue screen explaining to your user that the app has failed due to inadequate connectivity. For a superior user experience, give the user the option to try and connect again, if possible.
But, as anyone that has ever coded a try again button knows, this can be difficult to do depending if your network architecture isn’t separate from your app UI (common in most modern apps). The error and information explaining why it happened need to be raised to a point where the user can respond, which can be tricky to determine.
What is critical is considering how much detail about the network error you want to relay to the user. While the error number and data are useful for a developer, that much information is going to be overwhelming to a non-technical user. As a rule, if the information is not relevant to the user experience, it should be hidden from the user.
Permissions – An Informed User is a Happy User
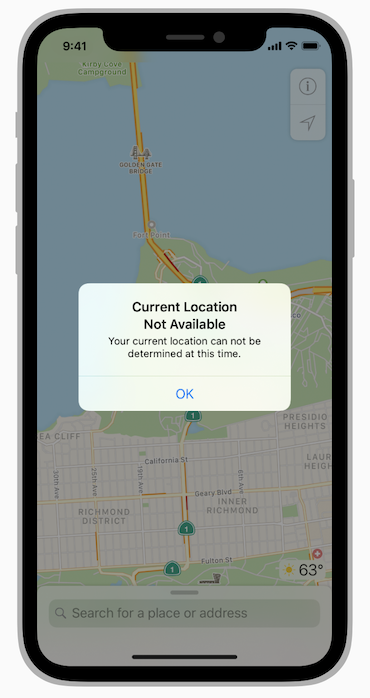
Building on communicating effectively with your user, sometimes you’ll have errors that require your user to make decisions to get the app working again. Apple’s system for accessing Protected Resources is a source of great examples of this scenario.
Even if you’re not intimately familiar with this aspect of the Apple ecosystem, it’s easy enough to understand: our phones and devices have a lot of sensitive information about us on them these days; Many apps use this data to help their users; This includes location information, your photos, and access to the camera itself, among other things. These are known as Protected Resources.
Because not all apps need access to them, by default Apple restricts access to Protected Resources. If an app needs a Protected Resource to carry out a function and doesn’t have access, this will create an error. To gain access, an app must make a case request, with an explanation of why it needs permission to use certain data or hardware functions. The user then decides whether to give permission to the app or not.
There are two key considerations when dealing with permissions. The first is making it clear to the user why the app needs access to a given Protected Resource. Apple itself is explicit about this:
Accurately and concisely explaining to the user why your app needs access to sensitive data, typically in one complete sentence, lets the user make an informed decision and improves the chances that they’ll grant access.
Having an easy-to-understand explanation then is not only needed, it makes for a better user experience and ultimately, a more successful app.
The second consideration is deciding how to handle the user denying permission. Again, clear communication to the user about the limitations of the app’s functionality if denied access is helpful. You also must decide, on a code level, how to deal with the persistent error of denied permission.
Ideally, you want the user to still be able to use the app, even if certain data or functions are not available. At the same time, it’s important to continue to make it clear that if a user wants to do something that needs a Protected Resource, they have to go into their settings and grant permission.
A stumbling block to be aware of is in some cases there isn’t (yet) a way of telling the difference between a lack of access and a lack of input. A good example of this is heart rate monitoring: an app may experience an error because it can’t collect data on a user’s heart rate, but isn’t able to report whether this is because of a lack of permission or because the heart rate sensor on the device isn’t working.
If you’re using health data, this is something to be aware of.
Missing Files – How to Fail Gracefully
While many errors are recoverable with some help from the user, sometimes there are errors that can happen, and will be fatal. How should you handle these?
Ideally, you want to handle these errors as cleanly and gracefully as possible. Missing files are a common example of this – when your app can’t find or access a key resource it needs to function, like a storyboard file, an image, a database, or a key piece of code. The app needs to close and a bug report sent to the developer to review the error and make fixes.
Indicate to the user that something has gone seriously wrong and the app needs to shut down. Perhaps offer them a button to close the app and assure them that a bug report has been sent. You can also let them know if it’s not just a glitch or the user has tampered with the app.