Getting Started with Mise for iOS and Swift Development
Over the years, I've used a variety of tools from Homebrew to Mint. Each have had their share of issues and perks. Over the past year I've gone with Mise, it seems to be best suited for what I'm looking for.
What is Mise?
Mise is a tool version manager. There are a lot out there but Mise fit what I was looking for. Here's what I have tried and didn't quite fit:
Homebrew
Homebrew is great for installing tools and apps locally on my computer. I recently purchased a brand new 15-inch M5 MacBook Air and rather than restoring from a backup I used Brew Bundle to restore the list of apps from my old MacBook Air easily. However for development tools, it's not really ideal especially in the case of Continuous Integration (automated build servers like GitHub Actions). I want an isolated environment when I use CI in order to have a repeatable environment regardless of OS or where the machine is hosted. So that fell short. Lastly handling multiple versions of language tools (ruby, node, etc...) is not ideal and is better suited with specific tools (rbenv, nvm, etc...).
Swift Package Plugin
There are several reasons I don't use Swift Package plugins but the biggest is the lack of support distinguishing between a consumer of a swift package vs a developer of a Swift package. I really don't want a consumer to need to pull Swift tools I use (swift-format, swiftlint, xcodegen, periphery, stringslint, etc...) as a developer when trying to consume my library. There are proposals and tools that try to remediate this but it really hasn't stuck. Therefore it's best to configure these outside of Package.swift.
Mint
Mint is a fantastic tool for installing Swift Package based tools. As a Swift developer, I frequently use tools like swift-format, swiftlint, xcodegen, periphery, and stringslint. To be able to install these tools on my machine is great. However there were a few shortcomings:
- It's not really meant for continuous integration so you don't get the isolated environment which CI requires.
- Only suited for Swift Packages. If you have a web application attached (node) or require fastlane for deployment (ruby), you'll need an additional tool to do this.
- Every swift package is rebuilt; so deployment via binaries is unavailable meaning long build times just to get the tool up and running.
Why Mise
Mise solves a lot of these issues:
- Single tool replaces multiple version managers
- Same configuration works locally and in CI
- Eliminates hardcoded paths in CI/CD
- Team consistency through version control
- Has support for a swift package registry as a fallback.
For my projects, it manages everything from Node.js to Swift tooling.
Getting Started
The first thing you are going to want to do is install mise.
1. Install Mise
# Via curl
curl https://mise.run | sh

# Via Homebrew
brew install mise

# Configure shell activation (use whichever matches your shell)
echo 'eval "$(mise activate zsh)"' >> ~/.zshrc    # zsh
echo 'eval "$(mise activate bash)"' >> ~/.bashrc  # bash
Once shell integration is active, tools managed by mise are available directly — just run swiftlint lint, tuist generate, etc. and mise automatically uses the pinned version. The mise exec <tool> -- prefix is still useful in scripts or CI environments where shell integration isn't set up.
2. Create .mise.toml at Repository Root
.mise.toml is the configuration file that declares which tools and versions your project needs. It lives at the repository root and gets checked into version control alongside your code. Once it's there, any developer — or CI runner — who clones the repo gets the exact same tool versions by running mise install. No more "it works on my machine" surprises.
[settings]
# Enable SPM backend for Swift tools
experimental = true

[tools]
# Swift tools via SPM
"spm:swiftlang/swift-format" = "602.0.0"

# Linting (via core or aqua)
swiftlint = "0.63.2"
Critical Settings Explained:
experimental = true— Enables the SPM backend for Swift Package toolsspm:<org>/<repo>— Tells mise to install a tool by building it from a Swift Package.
3. Create/Update Makefile
.PHONY: install-dependencies

# Install all mise tools
install-dependencies:
	@mise install
Why use Make here: Using a named Make target standardizes the setup command across team members, CI scripts, and onboarding docs. make install-dependencies is easier to document and remember than mise install alone — and it scales if you need to add other setup steps (e.g. npm install, pre-commit hooks) in the future.
4. Update GitHub Actions Workflow
Replace multiple tool setup actions with a single mise-action:
jobs:
  build:
    runs-on: macos-latest
    steps:
      - uses: actions/checkout@v6

      # This replaces multiple tool setup actions
      - uses: jdx/mise-action@v4
5. Test Locally
# Install tools
mise install

# Verify installations
mise list
Note for new clones: When a developer clones this repo for the first time, mise will not activate tools until they explicitly trust the config. Run
mise trustonce in the repo directory beforemise install.
Quick Reference Commands
# Install all tools from .mise.toml
mise install

# List installed tools
mise list

# Run tool explicitly (ensures correct version)
mise exec swiftlint -- swiftlint lint

# Check mise setup
mise doctor

# Show tool versions in current directory
mise current
Troubleshooting
Tool Not Found After Installation
Problem: Installed a tool but it's not in PATH
Solution:
# Ensure mise is activated in your shell
mise doctor

# Manually activate mise in current session
eval "$(mise activate zsh)"

# Or use explicit exec
mise exec swiftlint -- swiftlint version
Version Mismatch in CI
Problem: CI uses different version than local
Solution:
# Commit .mise.toml
git add .mise.toml
git commit -m "Pin tool versions with mise"

# Ensure mise-action@v4 is used in workflow
grep "jdx/mise-action@v4" .github/workflows/*.yml
Tools Not Activating After Clone
Problem: mise shows an "untrusted" warning and tools are not available after cloning a repo
Solution:
# Trust the repo's mise config
mise trust

# Then install tools
mise install
Conclusion
Setting up mise takes about ten minutes, but the payoff is a development environment that works identically on every machine and in every CI run. Commit .mise.toml, run mise trust on a fresh clone, and mise install does the rest — no more setup docs, no more version drift.
You can get an idea of my current toolset and where mise fits in:
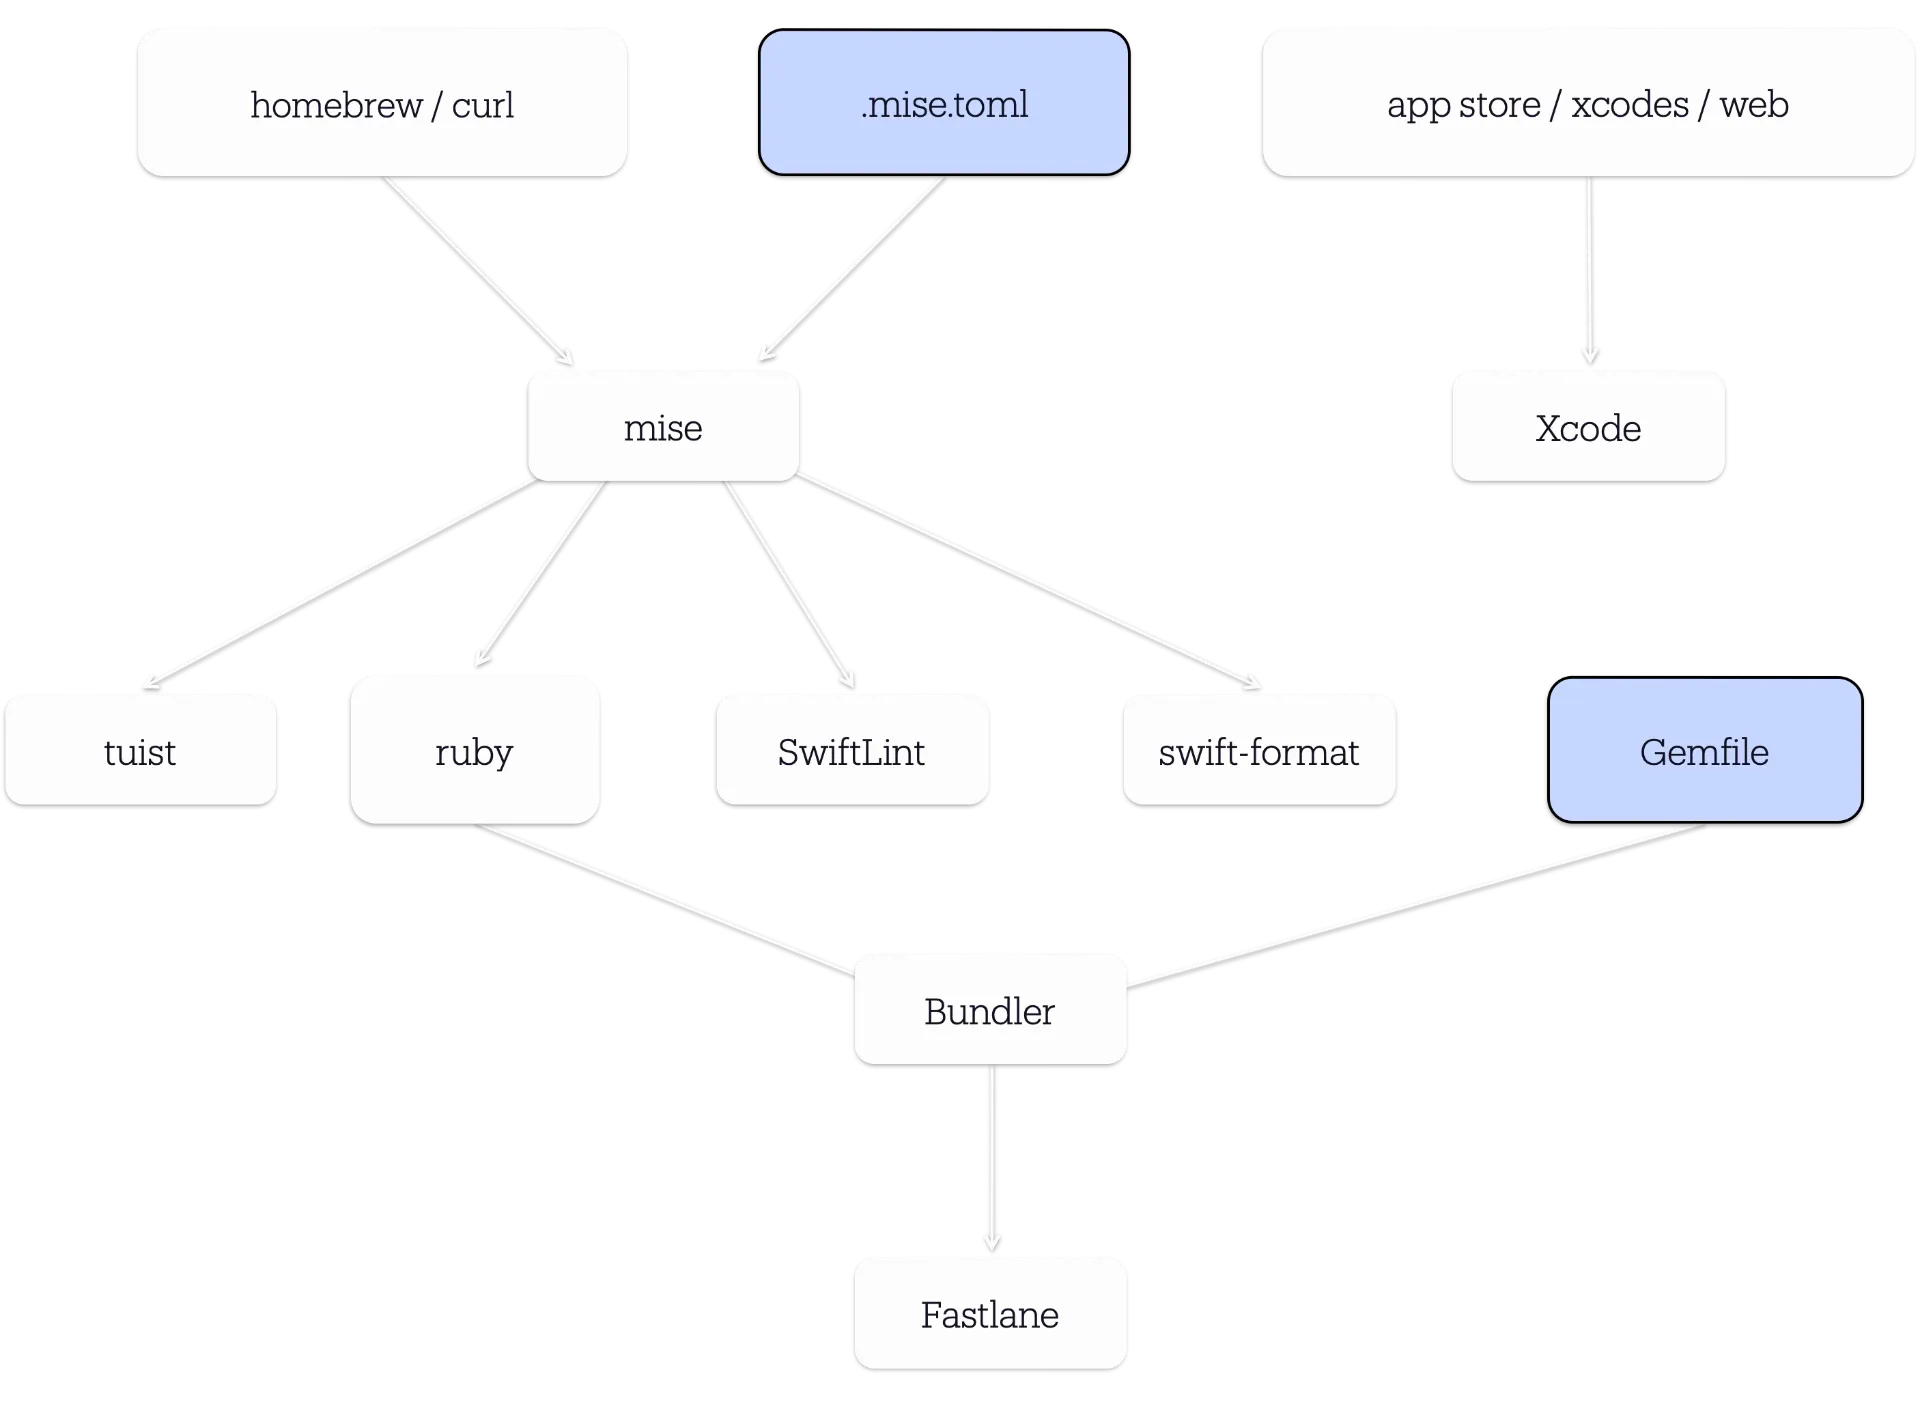
In the next article, we'll talk about a major piece of this setup - Tuist and how I use it to simplify my Xcode project setup.
Resources
- Mise Official Docs: mise.jdx.dev
- GitHub Action: jdx/mise-action
- Mise Registry: mise.jdx.dev/registry.html