Automating your Xcode Project
When creating an app, let’s think about what we need to get started. The Xcode project is the backbone of your application — it contains metadata like bundle identifiers and permission text, along with build configuration for your targets, which can include the app itself, frameworks, and app extensions.
The Xcode project uses a proprietary format that is notoriously difficult to work with, especially when dealing with merge conflicts in version control. In the ancient days, it was Storyboards and Xcode projects which were the biggest culprits of merge conflict hell. Coding your UI in UIKit and then SwiftUI eleviated the Storyboard issue but Xcode projects still remain.
This is where a tool which creates the Xcode project is most helpful. There’s 2 leading tools which I’d recommend: Xcodegen or Tuist. Xcodegen is great if you have a fairly simple app or minimal team structure. Xcodegen uses YAML for its specification structure — if you prefer a simpler static config format, it’s the right choice. For a broader look at both tools, see How to automate iOS development.
Tuist is what I’d recommend in most any other case. Tuist uses Swift for its manifest files, which is a deliberate design choice — it gives you type-checking and the full power of the language for complex configurations. Tuist has a very robust community and support as well. In the end I’d highly recommend not committing Xcode projects to your code repository.
Using Tuist
If you've followed the mise setup guide, add Tuist to your .mise.toml and you're set:
[tools]
tuist = "4.188.1"
Pinning to a specific version ensures everyone on the team — and your CI environment — uses the exact same Tuist build. latest can silently pull in a breaking release and break your project generation unexpectedly.
Homebrew also works for a quick local install:
brew install tuist
Homebrew works for local use, but doesn't give you per-project version pinning or a consistent CI environment. See Why Mise in the setup guide for the full comparison.
With mise shell integration active, run Tuist commands directly — mise automatically uses the pinned version. Without shell integration, prefix commands with mise exec tuist --.
You can begin using Tuist by running:
tuist init
For my app Lumemo, a memo-taking iPhone app for iOS 26, here is the Project.swift Tuist generated:
import ProjectDescription

let project = Project(
    name: "Lumemo",
    targets: [
        .target(
            name: "Lumemo",
            destinations: .iOS,
            product: .app,
            bundleId: "dev.tuist.Lumemo",
            infoPlist: .extendingDefault(
                with: [
                    "UILaunchScreen": [
                        "UIColorName": "",
                        "UIImageName": "",
                    ],
                ]
            ),
            buildableFolders: [
                "Lumemo/Sources",
                "Lumemo/Resources",
            ],
            dependencies: []
        ),
        .target(
            name: "LumemoTests",
            destinations: .iOS,
            product: .unitTests,
            bundleId: "dev.tuist.LumemoTests",
            infoPlist: .default,
            buildableFolders: [
                "Lumemo/Tests"
            ],
            dependencies: [.target(name: "Lumemo")]
        ),
    ]
)
This will get you started with the Tuist infrastructure. Tuist uses Swift for creating Xcode projects, so editing the project is fairly simple. You can edit Project.swift directly in any text editor, or if you want Xcode's type-checking and autocomplete while editing your manifest files, run:
tuist edit
This creates a temporary Xcode workspace that can compile your manifest Swift files — useful for catching typos or checking API signatures. When you're done, just close the workspace. Tuist writes your changes back to the manifest files automatically; no manual save is needed before closing.
To create the Xcode project and workspace, just call:
tuist generate
This will create the Xcode project and workspace where you can work on your app.
Don't edit the generated Xcode project directly. Any changes you make to
.xcodeprojsettings inside Xcode are not stored in your manifest files — the next time you runtuist generate, they will be silently overwritten. Always make changes inProject.swift(or viatuist edit).
Now that we've set up our first project using Tuist, let's dive into how the Xcode project works. The generated Project.swift uses buildableFolders, but for the walkthrough below we'll use the simpler sources parameter — it's easier to reason about as we build up to the final version.
Projects and their Targets
An Xcode target is the core of our Xcode project. It produces the testable and deliverable app. Here's what a typical Project.swift looks like at this early stage:
import ProjectDescription

let project = Project(
  name: "Lumemo",
  targets: [
    .target(
      name: "Lumemo",
      destinations: [.iPhone],
      product: .app,
      bundleId: "com.brightdigit.Lumemo",
      sources: ["Sources/**"]
    )
  ]
)
Let’s take a look at how these map out:
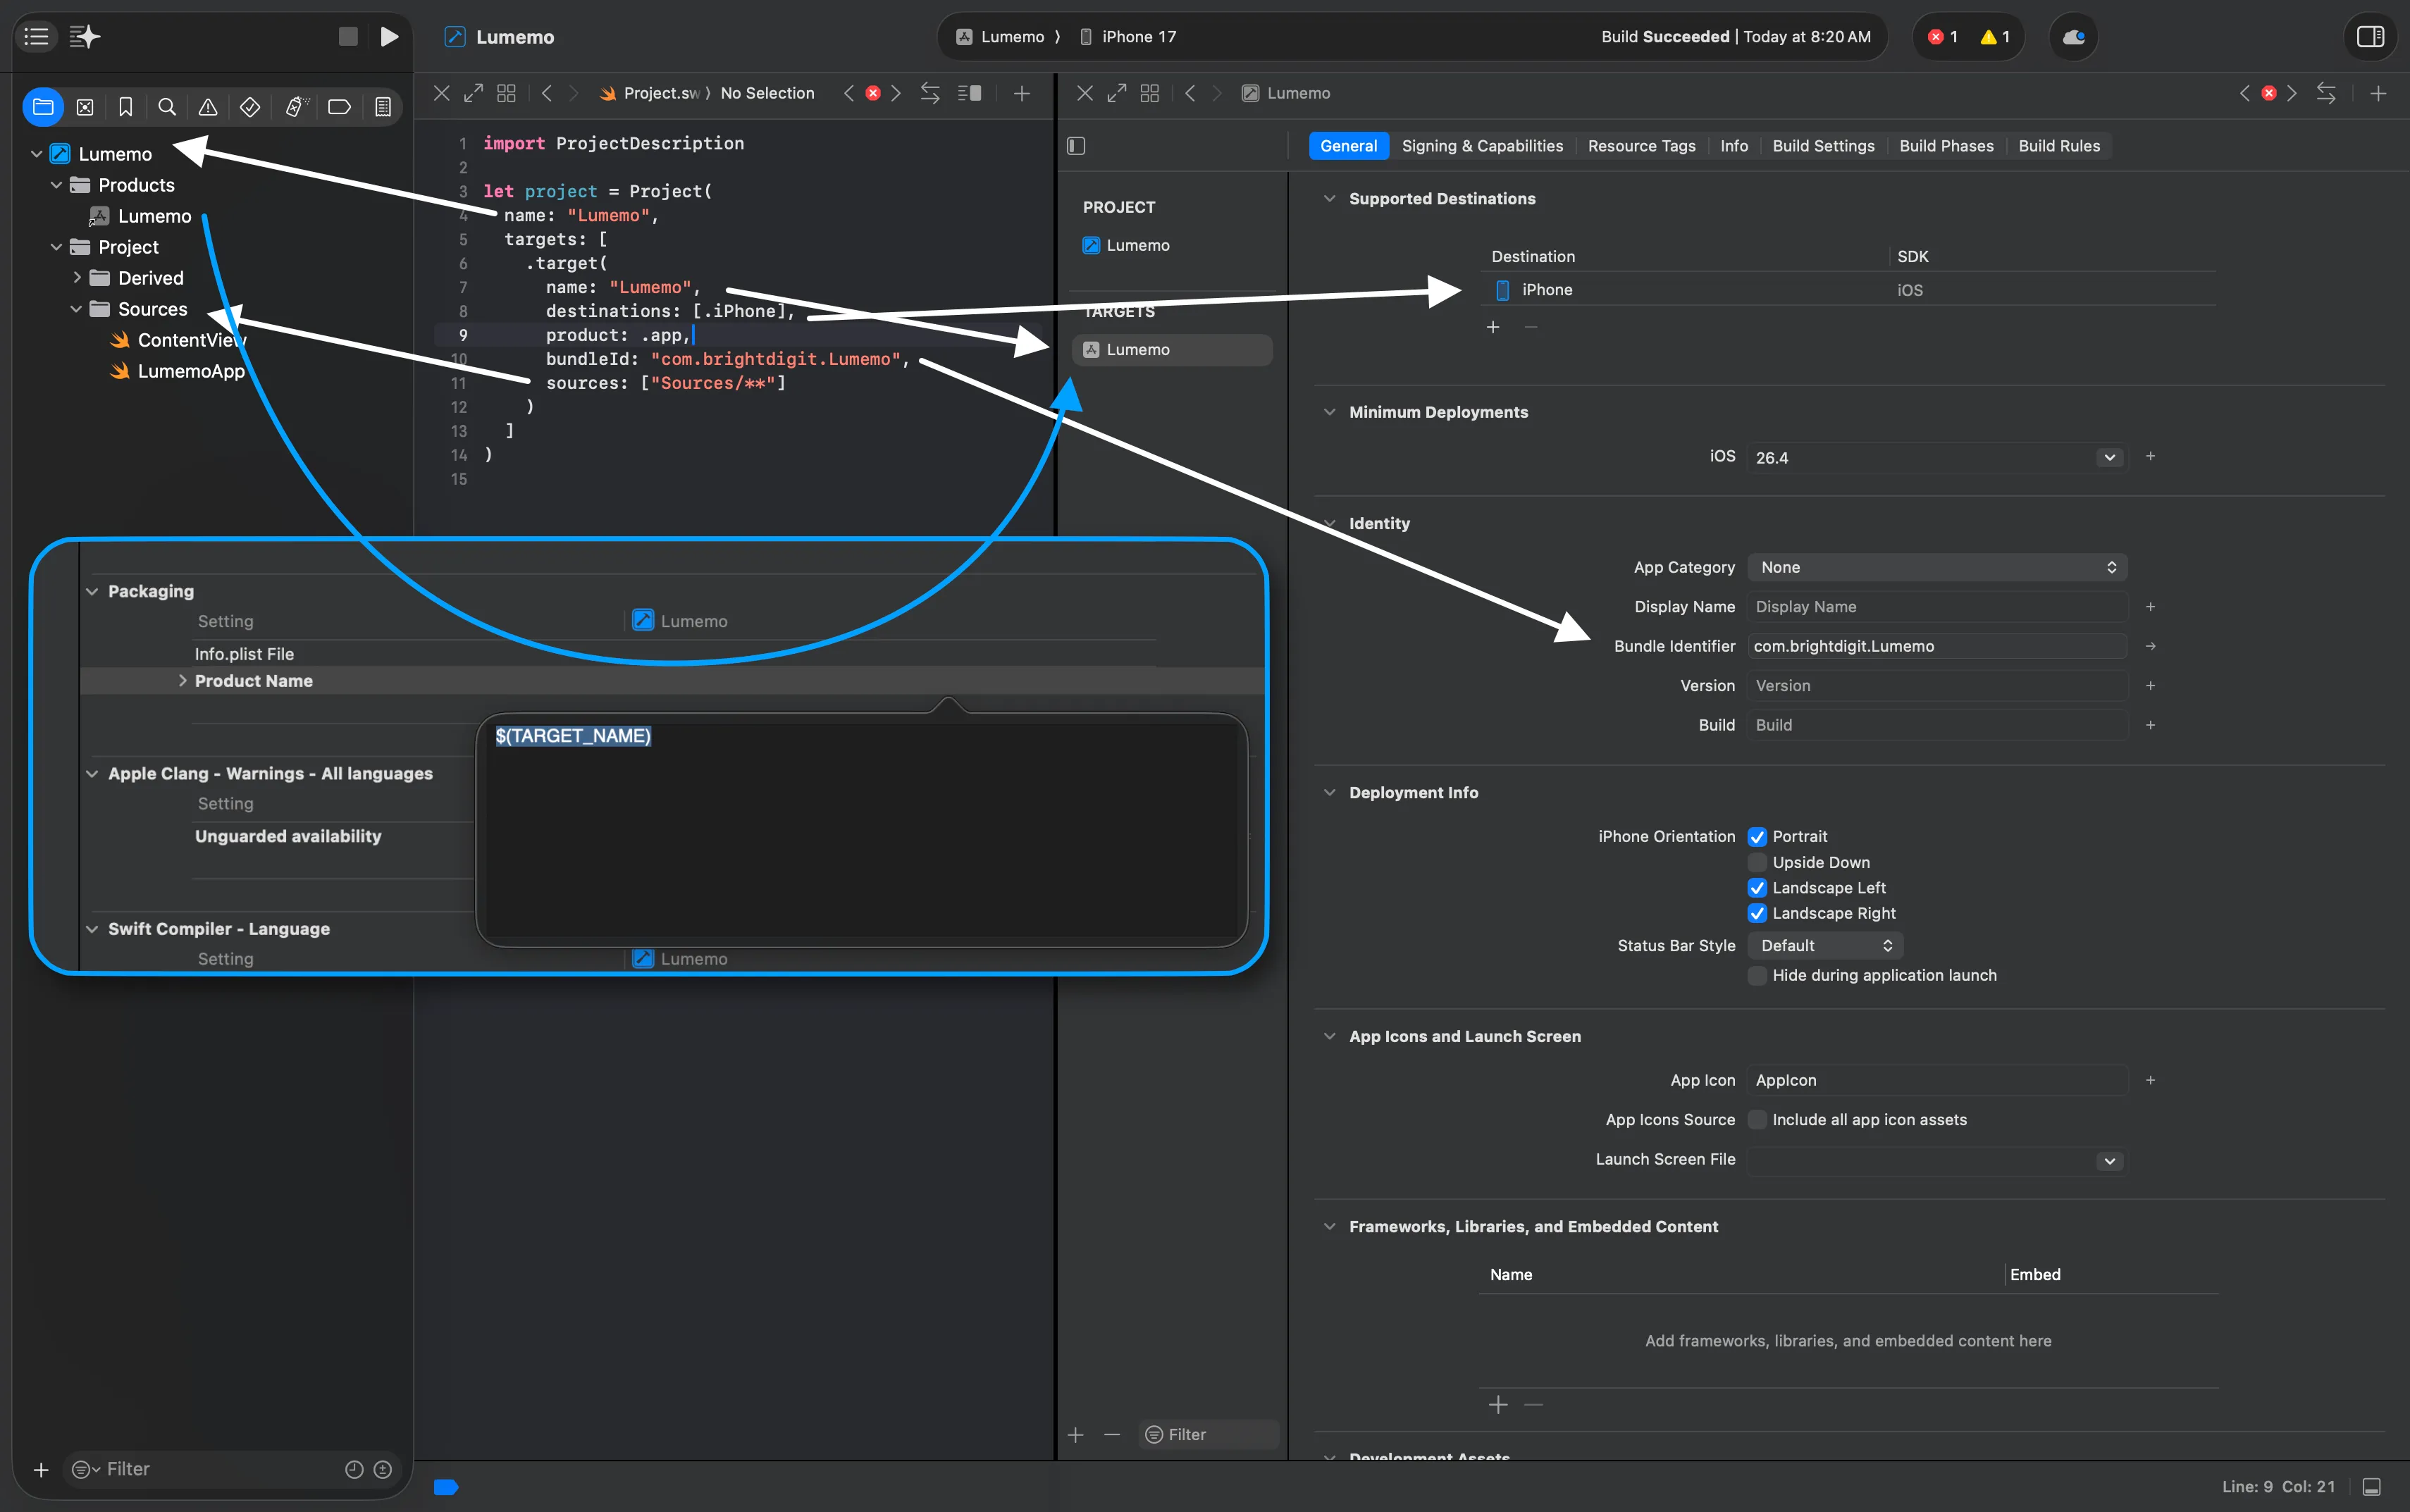
At the top, we have the name of the project "Lumemo". Inside we have out sets of targets. Typically Tuists sets up a test target but we removing that for simplicity sake for now.
Targets
A target could be anything from a app extension to a framework to a unit tests. Esentially anything which could in that target spot. These different types (app extension, framework, etc...) are defined as product types. In tuist, we use an enum called Product. In our case this is an .app.
We have a few identifiers here including the target name and the bundle ID. The bundle identifier must follow reverse DNS naming and is unique to the App Store. The target name is the name shown in the target list. Unless you specifically supply a product name, the target name will be used as the product name (i.e. the name of the .ipa, .app, .pkg, etc.).
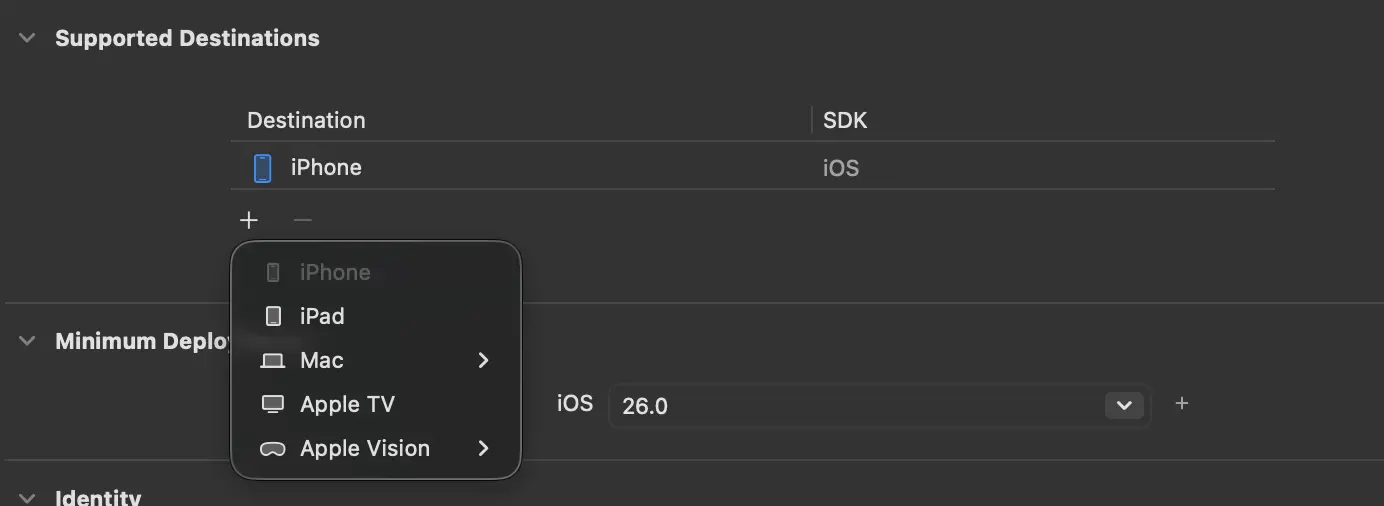
In this case we are setting our destination to .iPhone. This can be a variety of destinations — not only the platform (iOS) or device (iPad), but also cases where you want to target macOS or visionOS from an iPad app, or build a Catalyst app for macOS.
Last but not least are your source files, which accept an array of glob strings. These are added to your project as source files and compiled accordingly.
Now that we have the basics, we need to address a few gaps before this project is ready for App Store deployment:
- Notice the os version is set to the very latest based on the default of your Xcode version. We should set this so it's stable across Xcode versions.
- We are missing an app icon.
- We can't build it because we don't have a deployment team defined.
- Small App Store required info is missing such as exempt encryption use and our privacy manifest
- Lastly we don't have a stable way to define the app version.
Let's go through each of these.
Deployment Targets
As stated earlier, destination defines not just the platform or device but what technology is used to deploy to a particular. This usually means the device class. However in cases where you are catalyst for macOS or allowing an iPad app's destination on a Mac or Vision Pro these specifics are required.
To define the actual platform versions, you'd use deploymentTargets. If this isn't set, Xcode will use whatever the latest version available for that version of Xcode.
Under the hood, DeploymentTargets is just a set of properties for each Apple platform. In the Project intializer you can set the individual platform using one the static methods below:
     /// Convenience method for `iOS` only minimum version
    public static func iOS(_ version: String) -> DeploymentTargets

    /// Convenience method for `macOS` only minimum version
    public static func macOS(_ version: String) -> DeploymentTargets

    /// Convenience method for `watchOS` only minimum version
    public static func watchOS(_ version: String) -> DeploymentTargets

    /// Convenience method for `tvOS` only minimum version
    public static func tvOS(_ version: String) -> DeploymentTargets

    /// Convenience method for `visionOS` only minimum version
    public static func visionOS(_ version: String) -> DeploymentTargets
In our case we'll be targeting the minimum deployment version for iOS 26.0:
deploymentTargets: .iOS("26.0"),

Just as with destinations we can set variety of destinations, we have can create a multiplatform app as well:
     /// Multiplatform deployment target
    public static func multiplatform(iOS: String? = nil, macOS: String? = nil, watchOS: String? = nil, tvOS: String? = nil, visionOS: String? = nil) -> ProjectDescription.DeploymentTargets
App Icon
The app store requires App Icons before deployment. In our case since we are targeting a minimum of 26.0 we can use Icon Composer to create our app icon. To add it to app package, we just reference the file as a resource:
       resources: [
        "Resources/AppIcon.icon",
        ...
Xcode should automatically pick that up and use it.
Asset catalogs, text files, etc... any other resource would go here and a glob pattern can be used here as well.
Privacy Manifest
The Privacy Manifest is required too and can go under the resources property as well. Apple's Privacy manifest files documentation is the authoritative reference for building one.
Extending Other Default
Besides the privacy manifest, there's the ITSAppUsesNonExemptEncryption setting. If you ever tried to submit an app's first version to app review, you've seen this question asked.
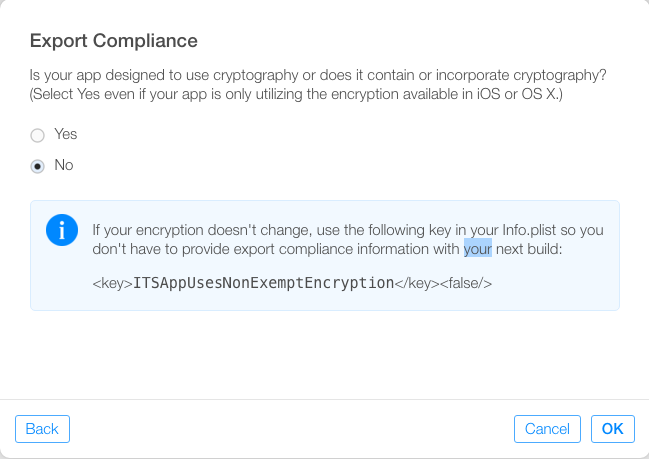
Luckily we can skip this step by simply supplying this property in our Info.plist file.
One thing great about Tuist, is that a lot of boiler plate and default values are already supplied to us for things like the Info.plist and the build settings. In our case we'll be using the .extendingDefault(with:) method to set ITSAppUsesNonExemptEncryption to false.
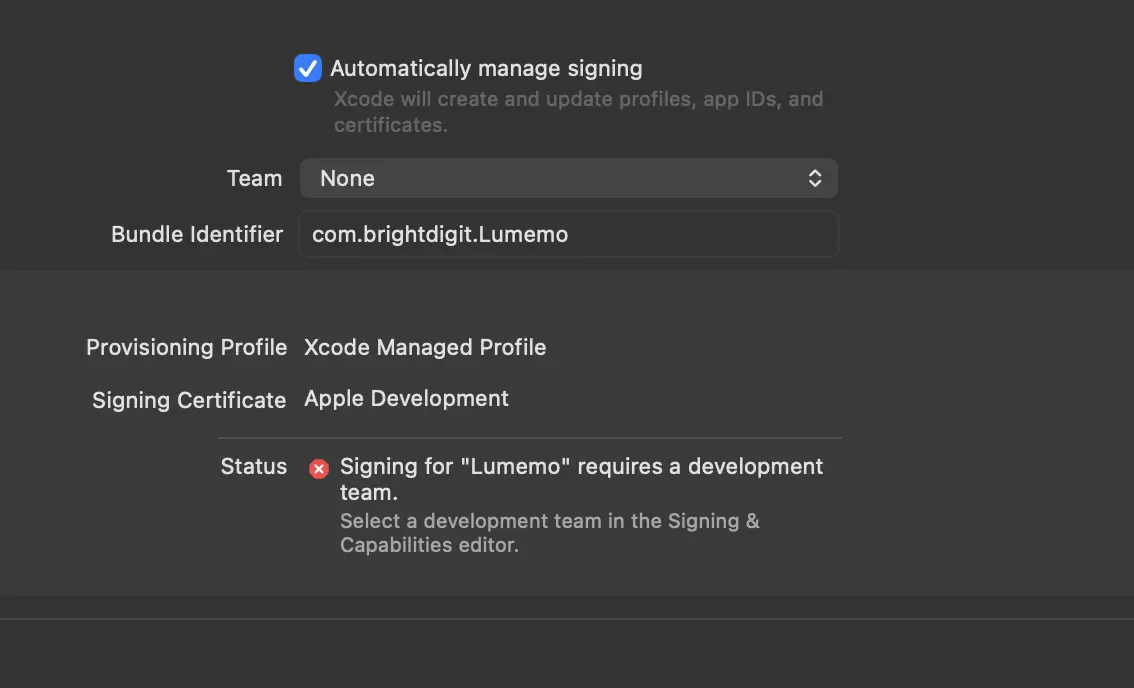
Let's do something like this for setting the development team. If you try to compile the app it will instantly complain that now development team is set. We can do this using the build settings and set it as a base property for all configurations:
       settings: .settings(
        base: [
          "DEVELOPMENT_TEAM": "XXXXXXXXXX", // Your 10-character Apple Developer Team ID
        ]
      )
Both of these functions for Info.plist and settings provide a plethora of property values that most users don't need to touch. This allows us to simply provide only the few overrides we need.
The last gap to close is version management.
Version Management with xcconfig
An app and its Xcode project contain 2 pieces of version information:
- Marketing Version (1.0.0) - this follows the typical semver string pattern and is what the user will see when they see the version number in the app store.
- Build Number (39) - this is a unique integer that identifies each build uploading to the App Store which could be for submitting to app review or it could be submited to TestFlight or not even submitted at all.
These settings are stored in the Info.plist. The Marketing Version is stored as a string as the property CFBundleShortVersionString. The Build Number is stored as CFBundleVersion. Of course we just hard code these in our Project.swift file for tuist to consume:
       infoPlist: .extendingDefault(
        with: [
          "CFBundleShortVersionString": "1.0.0",
          "CFBundleVersion": "1",
          "ITSAppUsesNonExemptEncryption": false,
        ]
      ),
```
However if you want to automate incrementing or updating the build number each time, a more reliable approach than depending on a regular expression to update these values is an xcconfig file. xcconfig files are well-documented and simple to understand — they are similar to .env files but with additional capabilities. Let's create a new file Config/Version.xcconfig and set the version info there:
MARKETING_VERSION = 1.0.0
CURRENT_PROJECT_VERSION = 2
As you can tell it's just a name-value pair, and we are using Xcode's standard nomenclature for these value names.
To let Tuist know about these we can import these into our build settings and configuration:
       settings: .settings(
        base: [
          "DEVELOPMENT_TEAM": "XXXXXXXXXX", // Your 10-character Apple Developer Team ID
        ],
        configurations: [
          .debug(name: .debug, xcconfig: .relativeToRoot("Config/Version.xcconfig")),
          .release(name: .release, xcconfig: .relativeToRoot("Config/Version.xcconfig")),
        ]
      )
``
Notice we are making sure we import into both the debug and release configurations. Also, since xcconfig is the native method for build configurations in Xcode, Tuist will reference the xcconfig file directly in the generated Xcode project.
Lastly we need to reference these properties in our Info.plist. To refer to a specific property we use the variable notation of :
$(ALL_UPPER_CASE_SNAKE_CASE_PROPERTY_FROM_CONFIGURATION_SETTINGS)
So in our case, our infoPlist would look like:
       infoPlist: .extendingDefault(
        with: [
          "CFBundleShortVersionString": "$(MARKETING_VERSION)",
          "CFBundleVersion": "$(CURRENT_PROJECT_VERSION)",
          "ITSAppUsesNonExemptEncryption": false,
        ]
      ),
``
This will make it much easier to increment the build number or change the marketing version.
This is what we should have for our end result:
import ProjectDescription

let project = Project(
  name: "Lumemo",
  targets: [
    .target(
      name: "Lumemo",
      destinations: [.iPhone],
      product: .app,
      bundleId: "com.brightdigit.Lumemo",
      deploymentTargets: .iOS("26.0"),
      infoPlist: .extendingDefault(
        with: [
          "CFBundleShortVersionString": "$(MARKETING_VERSION)",
          "CFBundleVersion": "$(CURRENT_PROJECT_VERSION)",
          "ITSAppUsesNonExemptEncryption": false,
        ]
      ),
      sources: ["Sources/**"],
      resources: [
        "Resources/AppIcon.icon",
        "Resources/PrivacyInfo.xcprivacy",
      ],
      settings: .settings(
        base: [
          "DEVELOPMENT_TEAM": "XXXXXXXXXX", // Your 10-character Apple Developer Team ID
        ],
        configurations: [
          .debug(name: .debug, xcconfig: .relativeToRoot("Config/Version.xcconfig")),
          .release(name: .release, xcconfig: .relativeToRoot("Config/Version.xcconfig")),
        ]
      )
    )
  ]
)
This will give us a fully working Xcode project but before we commit this to our repository, we need to make sure we aren't committing our project and workspace.
Ignoring Our Project
If you don't already have a .gitignore file, toptal has a great resource for creating one. I even have a url I download from everytime:
https://www.toptal.com/developers/gitignore/api/xcode,swift,swiftpackagemanager,swiftpm,macos
This should give me everything I need for my Xcode project except that I'll need to ignore the workspace and project file. Search for the line:
# *.xcodeproj
If you can't find it, you can just add the line instead of replacing the commented out one with this:
*.xcodeproj
We'll want to do the same thing for Xcode workspaces, so make sure we have the line:
*.xcworkspace
Lastly, derived files or caches from Tuist should be ignored as well:
.tuist/
Derived/
Now would be a good time to commit and push this to your repo. Every time someone pulls this repo, they should be able to use mise to execute tuist and generate the Xcode workspace and project.
One More Thing
For a typical app, a few more target properties are worth knowing about. Depending on what your app does, you may need one or more of these before submitting to the App Store:
entitlements- these are permissions your app requires such as HealthKit, App Groups, etc... - this is set via a DictionaryInfo.plist- there are a variety of settings you may need for your application- Apple Watch Companion Settings -
WKApplication,WKCompanionAppBundleIdentifier,WKRunsIndependentlyOfCompanionApp - File and URL Types -
CFBundleDocumentTypes,CFBundleURLTypes,UTExportedTypeDeclarations,UTImportedTypeDeclarations - Usage Descriptions - text for various access requests like geolocation, HealthKit, etc...
- Apple Watch Companion Settings -
Where does all the source code go?
Right now you should have a fully buildable app. However, this structure can be fairly limiting in terms of source code organization and compatibility. We'll be talking about how we can break down our application's source code into Swift Packages for easier testing, flexible OS compatibility, and easier modularization.